Comprehensive Guide for Skilled Mechanics: Key Parts to Check in a Used Car Inspection

It is important to thoroughly inspect a used car before buying itgray and black engine. Here are the key parts of the car that should be checked:

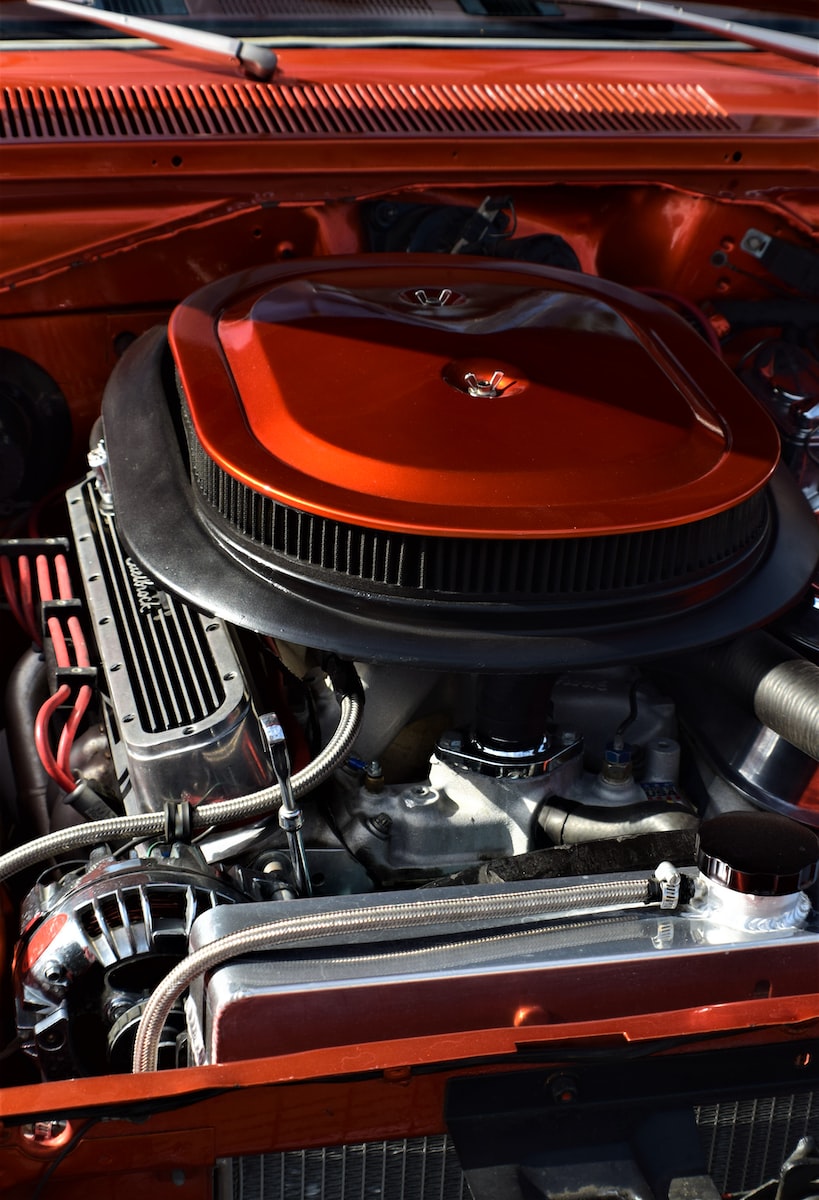
  1. Engine: Check for any oil leaks, coolant leaks, or signs of damage to the engine block. Look for any signs of poor maintenance, such as dirty oil or a worn-out timing belt. Check the oil level and condition, as well as the condition of the air filter.
  2. Transmission: Test drive the car to check for any unusual noises, vibrations, or hesitation when shifting gears. Check the transmission fluid level and condition, and inspect the clutch if the car has a manual transmission.
  3. Suspension: Inspect the shock absorbers, struts, and springs for wear and damage. Check for any signs of uneven tire wear, which could indicate an alignment or suspension issue.
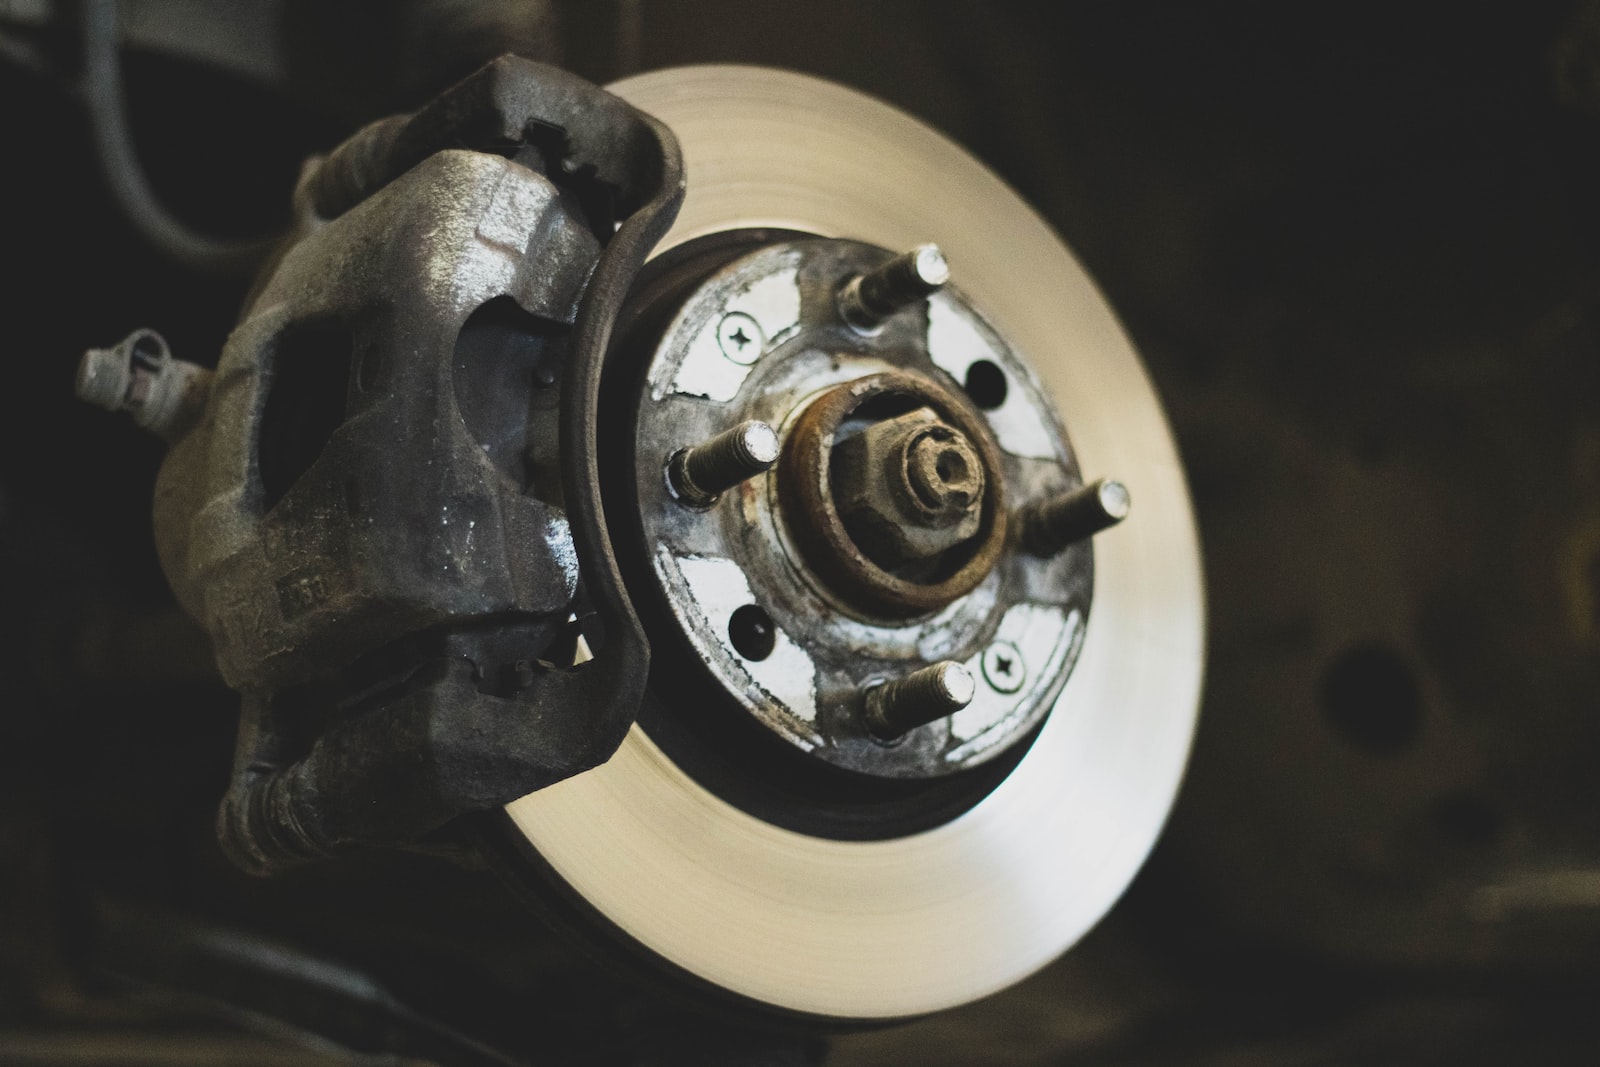
  4. Brakes: Check the brake pads and rotors for wear and damage, and inspect the brake lines and hoses for leaks or damage.
  5. Steering: Test drive the car to check for any looseness or play in the steering, which could indicate a worn-out steering rack or tie rods.
  6. Electrical system: Check the battery, alternator, and starter for proper operation, and inspect the wiring for any signs of damage or corrosion.
  7. Exhaust system: Inspect the exhaust pipes, muffler, and catalytic converter for damage or rust.
  8. Body and interior: Check for any signs of previous accidents or rust, and inspect the upholstery, carpet, and dashboard for wear and tear.

How To Test And Change Ignition Coil

Today’s topic is how to test and change ignition coil. An ignition coil is responsible for providing spark to the spark plug. Without the ignition coil, the spark plug will not be able ignite the fuel that is sprayed into the engine. A faulty ignition coil will cause an engine to misfire which will ultimately result in a loss of performance. Sometime, one or more faulty ignition coil is enough to prevent the vehicle from starting. A faulty ignition coil will trigger a P0300, P0301 P0302, and P0303, P0304 and so on. Moreover, it also depends which ignition coil has failed. Some of the common sign of a faulty ignition coil are:  rough idle, difficult to start, misfire, random misfire, hesitation, loss of power and no start.

Here are some ways to test if you have a faulty ignition coil. First, conduct a power balance test. With the engine running, simply disconnect one ignition coil at a time. A good ignition coil will result in a decrease in rpm. That means the ignition coil is function and that coil should not be replaced. Continue to conduct the power balance until there is no change when disconnecting the ignition coil. When there is no change that means that ignition coil on the cylinder it was disconnected is faulty. In addition, you can also use a test light to test for spark. Remove an ignition coil and connect the test light to battery negative. With the engine running, point the test light close to the boot of the ignition coil. If the ignition coil is good; there should be spark.

Next, you will need an OBD 2 scan tool to confirm the ignition coil is faulty. Locate the OBD 2 port and connect the scan tool. Next, press the read code button. The scan tool will give you a few codes if the check engine light is on. For example: Let’s say you disconnected cylinder number two and there is no change in rpm and let’s say the scan tool detected fault in cylinder number two or P0302. That means the ignition coil is faulty on that cylinder. When replacing an ignition coil, try to stick with OEM brands and not aftermarket parts. Usually, an aftermarket part will not last as long as OEM brands and it may not provide the full spark and spark plug needs.


How to change a radiator


Changing a radiator
is one the proudest achievement a DIYer can achieve. On top of that, you can easily save yourself a few hundreds of dollars. In this article, we will discuss the basic of a radiator, tools you may need, and what to do after replacing a radiator so the vehicle will not overheat. Let’s begin. Start by getting yourself a few basic tools. You will need a good set of metric and standard socket set and wrench. The tool set should also come with multiple ratchets in the size of ¼”, 3/8” and ½”. In addition, you will also need a channel lock plier, hose puller, oil pan and a funnel. In this example, we will use a common vehicle (Honda civic) as a basic vehicle for replacing a radiator.

Internal combustion engine and other components of mechanism of expensive luxury sports car parked next to wall decorated with graffitiFirst, start by disconnecting the battery for safety reason. Next drain the coolant by removing the drain plug.  Moreover, locate the cooling fans and remove the cooling fan which is normally held on by a few 10mm bolts. On some vehicles, the cooling fan may be held on by clips which need to be removed. Next, remove the upper and lower radiator hoses. You can use a channel lock plier to remove the hoses or a hose puller which will make it easier to remove. On some vehicle the radiator will have the upper brackets holding the radiator in place; remove the brackets. There may be a transmission line you will need to remove depending on the make and model. Remove the transmission line if needed. You may need a flare wrench to remove the transmission line.

After the line has been removed, it is time to remove the radiator. Remove the radiator and compare it to the new radiator. At this point; replace old parts as needed such as upper and lower radiator hoses and radiator cap. Install everything in reverse order such as the radiator and cooling fan. Make sure all the hoses and transmission line are tight. Replace any fluid that was lost during the removal such as antifreeze and transmission fluid. Connect the battery and start the engine with the radiator cap off. Allow the vehicle to idle for 20 minutes and at the same time topping off the radiator with coolant. During this process the cooling system will self bleed for air and pocket of air that may be in the system; Once 20 minutes has surpassed, replace the radiator cap and the vehicle is ready for a test drive.

How to change a valve cover gasket

It is important to change a valve cover gasket if the vehicle has high miles or is over 7 years old. The reason is, the valve cover gasket prevents oil from leaking externally. First start by conducting a simple inspection; locate the valve cover and look for signs of oil leaking around the valve cover gasket. Usually when a valve cover gasket starts to leak; the engine oil starts to leak from the top of the engine and slowly drips to the bottom. In addition, if the valve cover gasket very worn out, it may start to leak into the spark plug tube and cause the vehicle to misfire. When this happen, the vehicle will start to run rough or it may not start at all. Let’s start by having a good set of basic tools such as metric and standard socket set and wrenches, a few 3/8” extensions, pliers, new valve cover gasket, tube seals, permatex silicone and a rubber mallet.

red and black engine bayWe will use a basic vehicle such as a Honda Civic as a demonstration how to replace a valve cover gasket.  As always safety first, so disconnect the negative side of the battery. Next, remove the ignition coil or spark plug cables. Remember which cylinder the ignition coil and spark plugs goes to. You can label it with a permanent marker if it helps. Moreover, remove all the bolts holding down the valve cover. Usually it will be 10mm bolts. Remove the pcv hoses if it is attached to the valve cover. On some vehicle, the intake manifold will be on the way of the valve cover so that needs to be removed. The next step is to remove the valve cover. Use a rubber mallet and tap on the outside of the valve cover to break it loose. Remove the valve cover.

The next step is to clean the surface of the valve cover gasket and the mating surface on the head where it meets. Use a razor blade or a wire brush to clean the surface. After all of that is done. Replace the valve cover gasket and use silicone on each corner of the valve cover. Moreover, replace the tube seals as well. In addition, you may also want to replace the rubber grommet that holds the valve cover in place if comes with your valve cover kit. Install the valve cover and install everything in reverse order. Start your vehicle and inspect for possible leaks.

How to change disc brakes

Today’s topic is about how to change disc brakes for DIYer. Changing disc brakes is one of the easiest yet useful skills a person can attain when it comes to automotive repair. Let’s begin the step the step that is required to replace one. Here are a set of tools you will need to begin. First you will need a reliable floor jack and a good set of jack stand. Next, you will need a set of metric and standard socket tools, wrench and ratchet. Moreover, you will need C-Clamp, large channel lock pliers or a brake disc spreader. In addition, you will need brake cleaner, brake caliper lube, and something to hang the caliper i.e a piece of hanger or a bungee cord. Now you have all the required tools to replace your disc brakes. Let’s begin.

white and silver round deviceStart by locking the rear brakes if you are changing the front brakes by setting the foot or hand brakes. Use wheel chuck or a piece of wood to lock the wheels that are not being worked on. Break loose the wheel lug but do not remove it completely. Next, place the floor jack on proper lifting points on the vehicle. Lift the vehicle and slowly place the vehicle on jack stands.  Remove the wheels. Locate the brake disc caliper and find the bolts holding it in place. Remove the bolts. Usually there are two bolts. One on top and one on the bottom; remove the caliper and use a brake disc spreader and compress the caliper piston inward. You can also use a large channel lock or C-Clamp to compress it. After piston has been compressed inward; Use a bungee cord to hang it.

Next, remove the old brake disc and inspect the brake hardware. At this point feel free to replace the brake hardware as needed. Use brake cleaner and clean the entire brake area. Allow it to dry for a few minutes. Next lube the sliding pins and make sure it slides in and out freely. Replace the old disc brakes with new ones. Use brake quieter as needed and it put it on the back side of the new disc brakes. Afterward, install the caliper and tighten all the bolts At this point, you can install the wheel and lift the vehicle and let it sit on the floor. When you are done, the last step is to pump your brake pedal a few times until it becomes firm. Now you disc brakes are set and you are ready to take it for a test drive.

“Changing your disc brakes on your cars may be one of the things you may be able to do yourself. If you are in doubt you shoud always consult a professional mechaninc”, says Daniel from Bilforsikring.

Find a Mechanic for your car

Most people don’t think about a mechanic until their car starts acting funny or the lights on the dashboard start screaming at them. By then it is usually too late and once you get your car into the shop you will have any number of problems that require fixing. Generally speaking most people tend to go with the same mechanic that they have used before. This doesn’t mean sticking with the same mechanic is a bad idea but much like doctors, using a different mechanic may make a world of difference for your car. Knowing where and who to take your car too should be more than just choosing the closest shop to your house.

Reviews

man in black jacket and blue denim jeans riding motorcycleLike any business mechanic shops get reviewed by their customers. This is especially beneficial when shopping around for a mechanic. Seeing how good or bad a potential mechanic shop is can make the difference between getting a lot of trouble and an expensive bill or quick and efficient service. Not all mechanic shops are created the same. Looking at online and consumer reviews will help weed out any potential problems. Also another good way is to ask friends, family, coworkers, and anyone else you trust who they recommend. Much like the reviews, recommendations can save a lot of time and money.

Type of car

Another thing to keep in mind is the make and model of the car. While most cars have a number of interchangeable parts, this isn’t always the case. Additionally certain cars require specialized servicing. This can be as simple as knowing where certain parts are located to a whole different knowledge base. Knowing if your car requires and/or if a shop can handle this before visiting can save the mechanic and yourself a major headache. This is especially true for older cars as finding certain parts may be more difficult for some mechanic shops than others. In the case of classic or vintage cars finding the right part can be all but impossible in some cases. This is especially true for a mechanic shop that isn’t familiar with these types of vehicles.

mechanic working on carConclusion

When everything is said and done, finding the right mechanic might take some time and a bit of trial and error. Once you do find a mechanic shop you are happy with you can rest easy knowing that your car is in good hands.